I have been teaching ceramics classes for about 4 years now. And before that I taught sculpture classes and we would always have at least 2 projects with clay during those classes. Now, as students work, clay dries out and because “unusable” for awhile. Clay dries out because as you work with it, you hands and the air take out the moisture, kids build things that they don’t want or need, they fail to wrap up their pieces correctly and instead of trying to work with it, they move on, or they rip holes in the bags that hold the clay. So, due to all of these reasons, I have a ton of extra clay. Seriously…it is just so.much.clay.
Normally, I reconstitute my clay by putting the pieces in a 5 gallon bucket and then fill the bucket with water. Eventually the clay softens and becomes slurry-like. From there, I pull some out, put it on a plaster bat, and let it dry enough so I can wedge the clay back into a usable form for my students. Quite frankly, this is a pain in the ass. I hate wedging with a passion. It reminds me how weak and out of shape I am. Not to mention it is time consuming.
Recently it was brought to my attention that our district has a grant program. I thought great, I can apply for a grant, talk to the principal to see if the district will help with the cost, and add in the money that ceramics club has raised, and with all that I can purchase a pugmill to help me on my “mission” to get all this dried clay usable again. I asked a group of potters on a Facebook group I am part of for a pugmill recommendation. That is when a woman told me this method of reconstituting I had never heard of.
She told me to put no more than 2 cups of water into the bag with the dried out clay. Next put the clay bag in a big bucket–like a 5 gallon one, and fill the bucket with water until the bag of clay is covered. Finally, let it sit for a week or so. The theory is the pressure from the water outside of the bag will push the water in the bag back into the clay and soften the clay so it can be used again. I’m gonna be honest here, I was a little skeptical. But, I did it anyway. 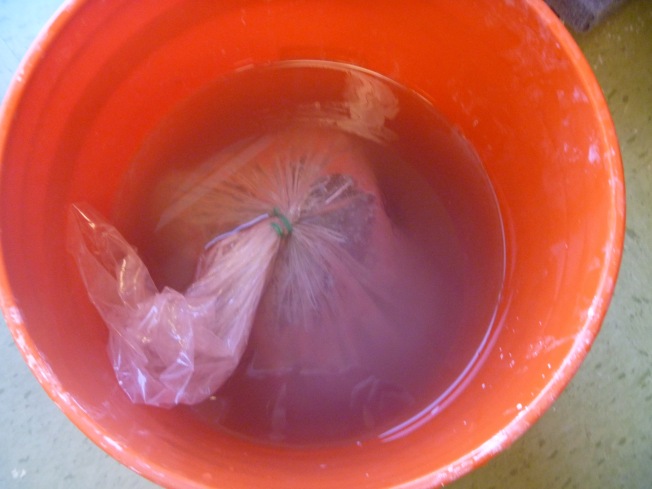
Well, after about 5 days I checked the bucket. Almost all of the water I had put into the bag was gone…it had soaked into the clay. I took the bag out of the bucket and opened to see what the clay felt like. It was a little slimy on the outside, but the clay it self was wet all the way through. It was as if it was brand new from the store. And bonus, because this was a bag of clay that was solid and not a bunch of pieces left over, I don’t have to wedge it. I was able to re-bag it and put it with the other clay for my students to use.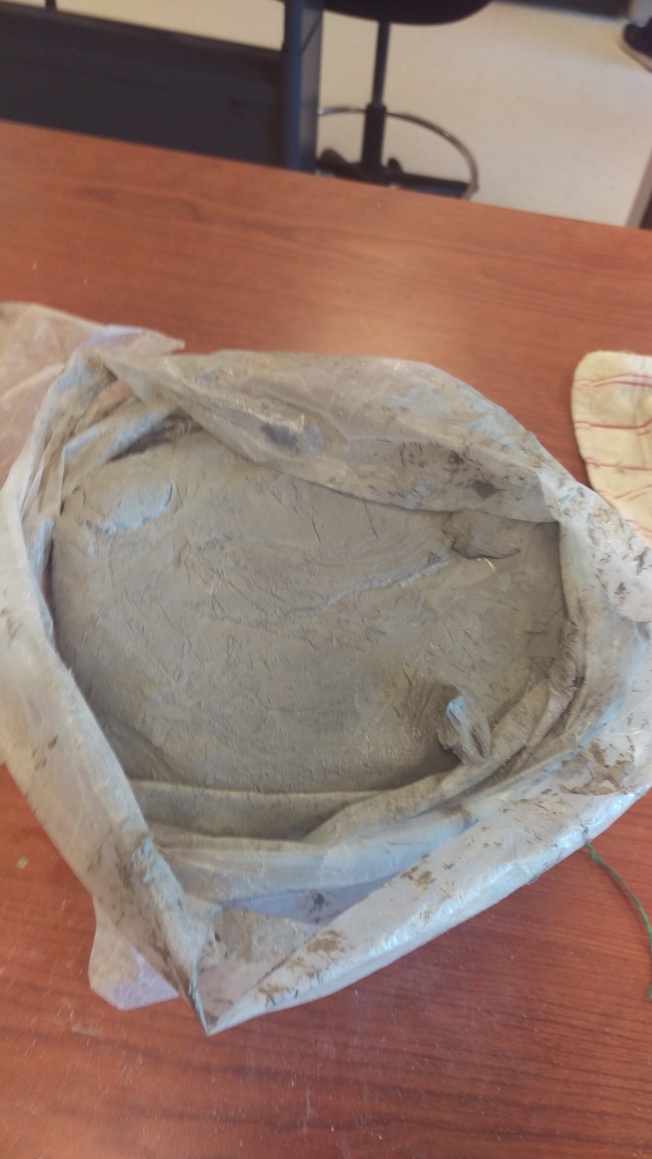
I am so excited that this worked. I went through all my clay and pulled all the bags where the clay was one big giant block like this and put them aside. I loaded up my bucket with a new block and water, and in a week I hope to have another bag ready to go. I still have the other buckets with scraps the kids create, and that will have to wedged, but this new method will really help me out, and I can save the ceramic club’s money for something more fun for us to use it on.

Still will need some wedging to get the air pockets out, so nothing explodes during firing, but yup. We did something like that at our production house.
The clay that I am doing this with isn’t scraps…it is the blocks of clay that the kids left open or something got ripped so the blocks dried out some.
Much easier..to wrap clay in a wet towel and put block back in bag and in about a few days you have perfect clay. ..no wedging..no issues no big bucket nothing…. I let it sit for a few days to weeks…sometimes I forget and it’s the same either way. ..
For me, this is easier. But thanks. 🙂
Hi there, if I have bits and pieces of clay that have dried out, i just wrap a wet towl or cloth around the bunch of it and let it sit for a while. Depending on the type of clay, I could start using it again in less than an hour. I most likely have much smaller amounts compared to you though but I have found this really helpful. I also use a wet towl around blocks of clay that are hard and have started to dry out a bit much. Depending how much they have dried out, it may take a couple of days with the towl wrapped around the whole block. Or longer if it was dryer.
This may not be suitable for you, but a reader may find it helpful.
I was told about this method about 6 weeks ago and have found it really helpful as I used to just chuck all my dried out scraps into water but then it would take me forever to get it back to a good working consistancy because I didn’t have a plaster board to help draw out the moisture.
Thanks for sharing this tip. I was always told even newly purchased clay fresh out of the bag needs to be wedged. Maybe all my teachers are just extra cautious.
I have been told that too, but that it is more important for wheel throwing and not so much for handbuilding. I have never wedged my clay out of the bag for handbuilding, and my professors at college never insisted that I did. They did rec for wheel throwing.
U do not need to wedge new clay that is out of the bag
That’s what I was told too. Wedge it even though it’s from the bag. But I don’t really!
Great idea! I have a question…how “dry”was the at clay in the bag? Like solid bone dry or was it still moist but hard in the center? Reclaiming is my LEAST favorite thing to do so today you could become hero LOL!!!
I wasn’t bone dry. But it was leather hard. I just put an even drier, but still not bone dry bag in. I have some that are almost bone that I plan on trying this with.
I hate reclaiming too.
I have been reclaiming like this for ages…it really does work, just wish it were quicker, but hey!
Very interesting, I will try this with all my own clay that is gradually covering the floor in buckets. The next question is what about if you have two or three different clays, can you just moosh them all together???
I think if they are the same temp, like low fire, then I don’t see why you can’t combine. I’m not really sure though
Yes but be sure they are the same cone. Although I wonder if different cones are used it can be done but you’d have to test fire it.
I recently bought a Peter Pugger pugmill and am having soooo much fun with it…. no messy towels, no buckets of water. I just throw the clay scraps in (can be bone dry or wet), add some water and pug it out. No wedging necessary for pugged clay.
That’s what I want but they are so expensive. I don’t do production.
This works great
Pingback: Tired of Traditional Wedging? | Art Class by Mrs. B
Hi Mrs. B –
This is Mrs. H. Several years ago, I met a someone wanting to get rid of 250-300 lbs of unused clay that had dried to leather hard. I took it all. Back in my class room I opened the first bag, peeled the plastic away from the sides, and dumped about 6 oz of water down each side. After closing the bag up tight, I just left it on the counter and watched it until I could see all the water had been absorbed – was perfect! I think your method is better for irregular scraps. Some people will throw away unused clay though. I had enough clay for my entire school year and part of the next!
As to wedging out of the bag – your success is going to depend on the type of pug mill your supplier uses. My supplier uses a pug mill that requires the clay to be wedged. I learned the hard way with lots of breakage. It’s not a big deal though. I start teaching kids to wedge their clay in kindergarten, and by second grade everyone does it themselves!
You sound awesome for teaching wedging so young! Wish my past students knew wedging already!!!!!
Does this work for bags of scrap pieces of will the water only be forced into an unused block?
Not sure. I’ve kept my scraps in a bucket with water and then it turned to sludge.
When clay starts to dry out in the bag, use a dowel rod, make three or four holes in the clay and fill with water. Clay reconstitutes itself. Before summer break, do that to unopened bags, keeps it ready to go when school resumes.
I ordered a large plastic garbage can on wheels from our district supply. Then lined it with a LARGE heavy duty garbage sac. All our scraps go into the can and I add some slurry or water occasionally. The clay is ready for use with a little wedging. And we don’t have waste, or a lot of wet leaky bags around.
We had a lot of half blocks of clay left. We also have buckets for scraps that eventually get wedged.
Make the students wedge the clay. It will give them a greater appreciation and maybe they will take better care of their projects. I make my students wedge clay. And there is always a clown.. 😉
Because I only have 2 periods of ceramics, lining up when clay is ready to be wedged and when the kids are there isn’t always easy
Wow, thanks for sharing…I sadly just got rid of a whole bunch of dried clay, but each year I end up with more, so I will try this for sure!!!
I always have the students wedge the clay
Great information… Certainly I’ll give a try. Thank you so much.
This is absolutely the best tip I have heard of in years. Thank you so much.
I tried this process last year – it’s amazing!!!!
This process works great!
This is my favourite way of recycling & use it all the time.
Now to make life easier for you & so the method carries on you should show your students then in future one of them may become a potter & thank you.
Thxs for sharing this idea can’t wait to try it . Kimros misc crafts and ceramics
Was thanks alot was here looking for what to do with the clay that dried so let me even run haa
Thank you I can’t wait to try it out I have bags and containers of hard dry clay.
Thanks for sharing. I had heard of this method but missed the part that explained how it works.
Thanks so much! Great tip
I have wanted to work with clay for a very long time. I am a fused glass artist who uses pottery kilns. I recently found some clay a friend gave me a few years ago wrapped nice and tight. Not a whole block but a roll of clay about 3″ dia X 10″ length. It isn’t rock hard but what you might call leather hard. I just sprayed some water in the bag then put in large bowl with water. I did not know what temp the water should be though. Is there a difference in the water temp you put in the bucket?
It does not matter the temperature.
Thank you! My clay is now workable and I’m having a blast…:)
Thank you for that tip I’m going to give it a go.
I use this method too. Just be sure your bag does not have any holes in it or the surrounding water leaks in.
Curious… what pug mill did they recommend? I have a giant rolling garbage can full of dried clay from the last six years. Ain’t nobody got time for that.
I got a Peter Pugger VPM9SS. I was told to get the stainless steel one because I would be pugging different clay bodies, one being a mid-fire porcelain.
Very cleaver great idea thanks!